Messy DIY and Crafting

Archive for the ‘Gift Ideas’ Category

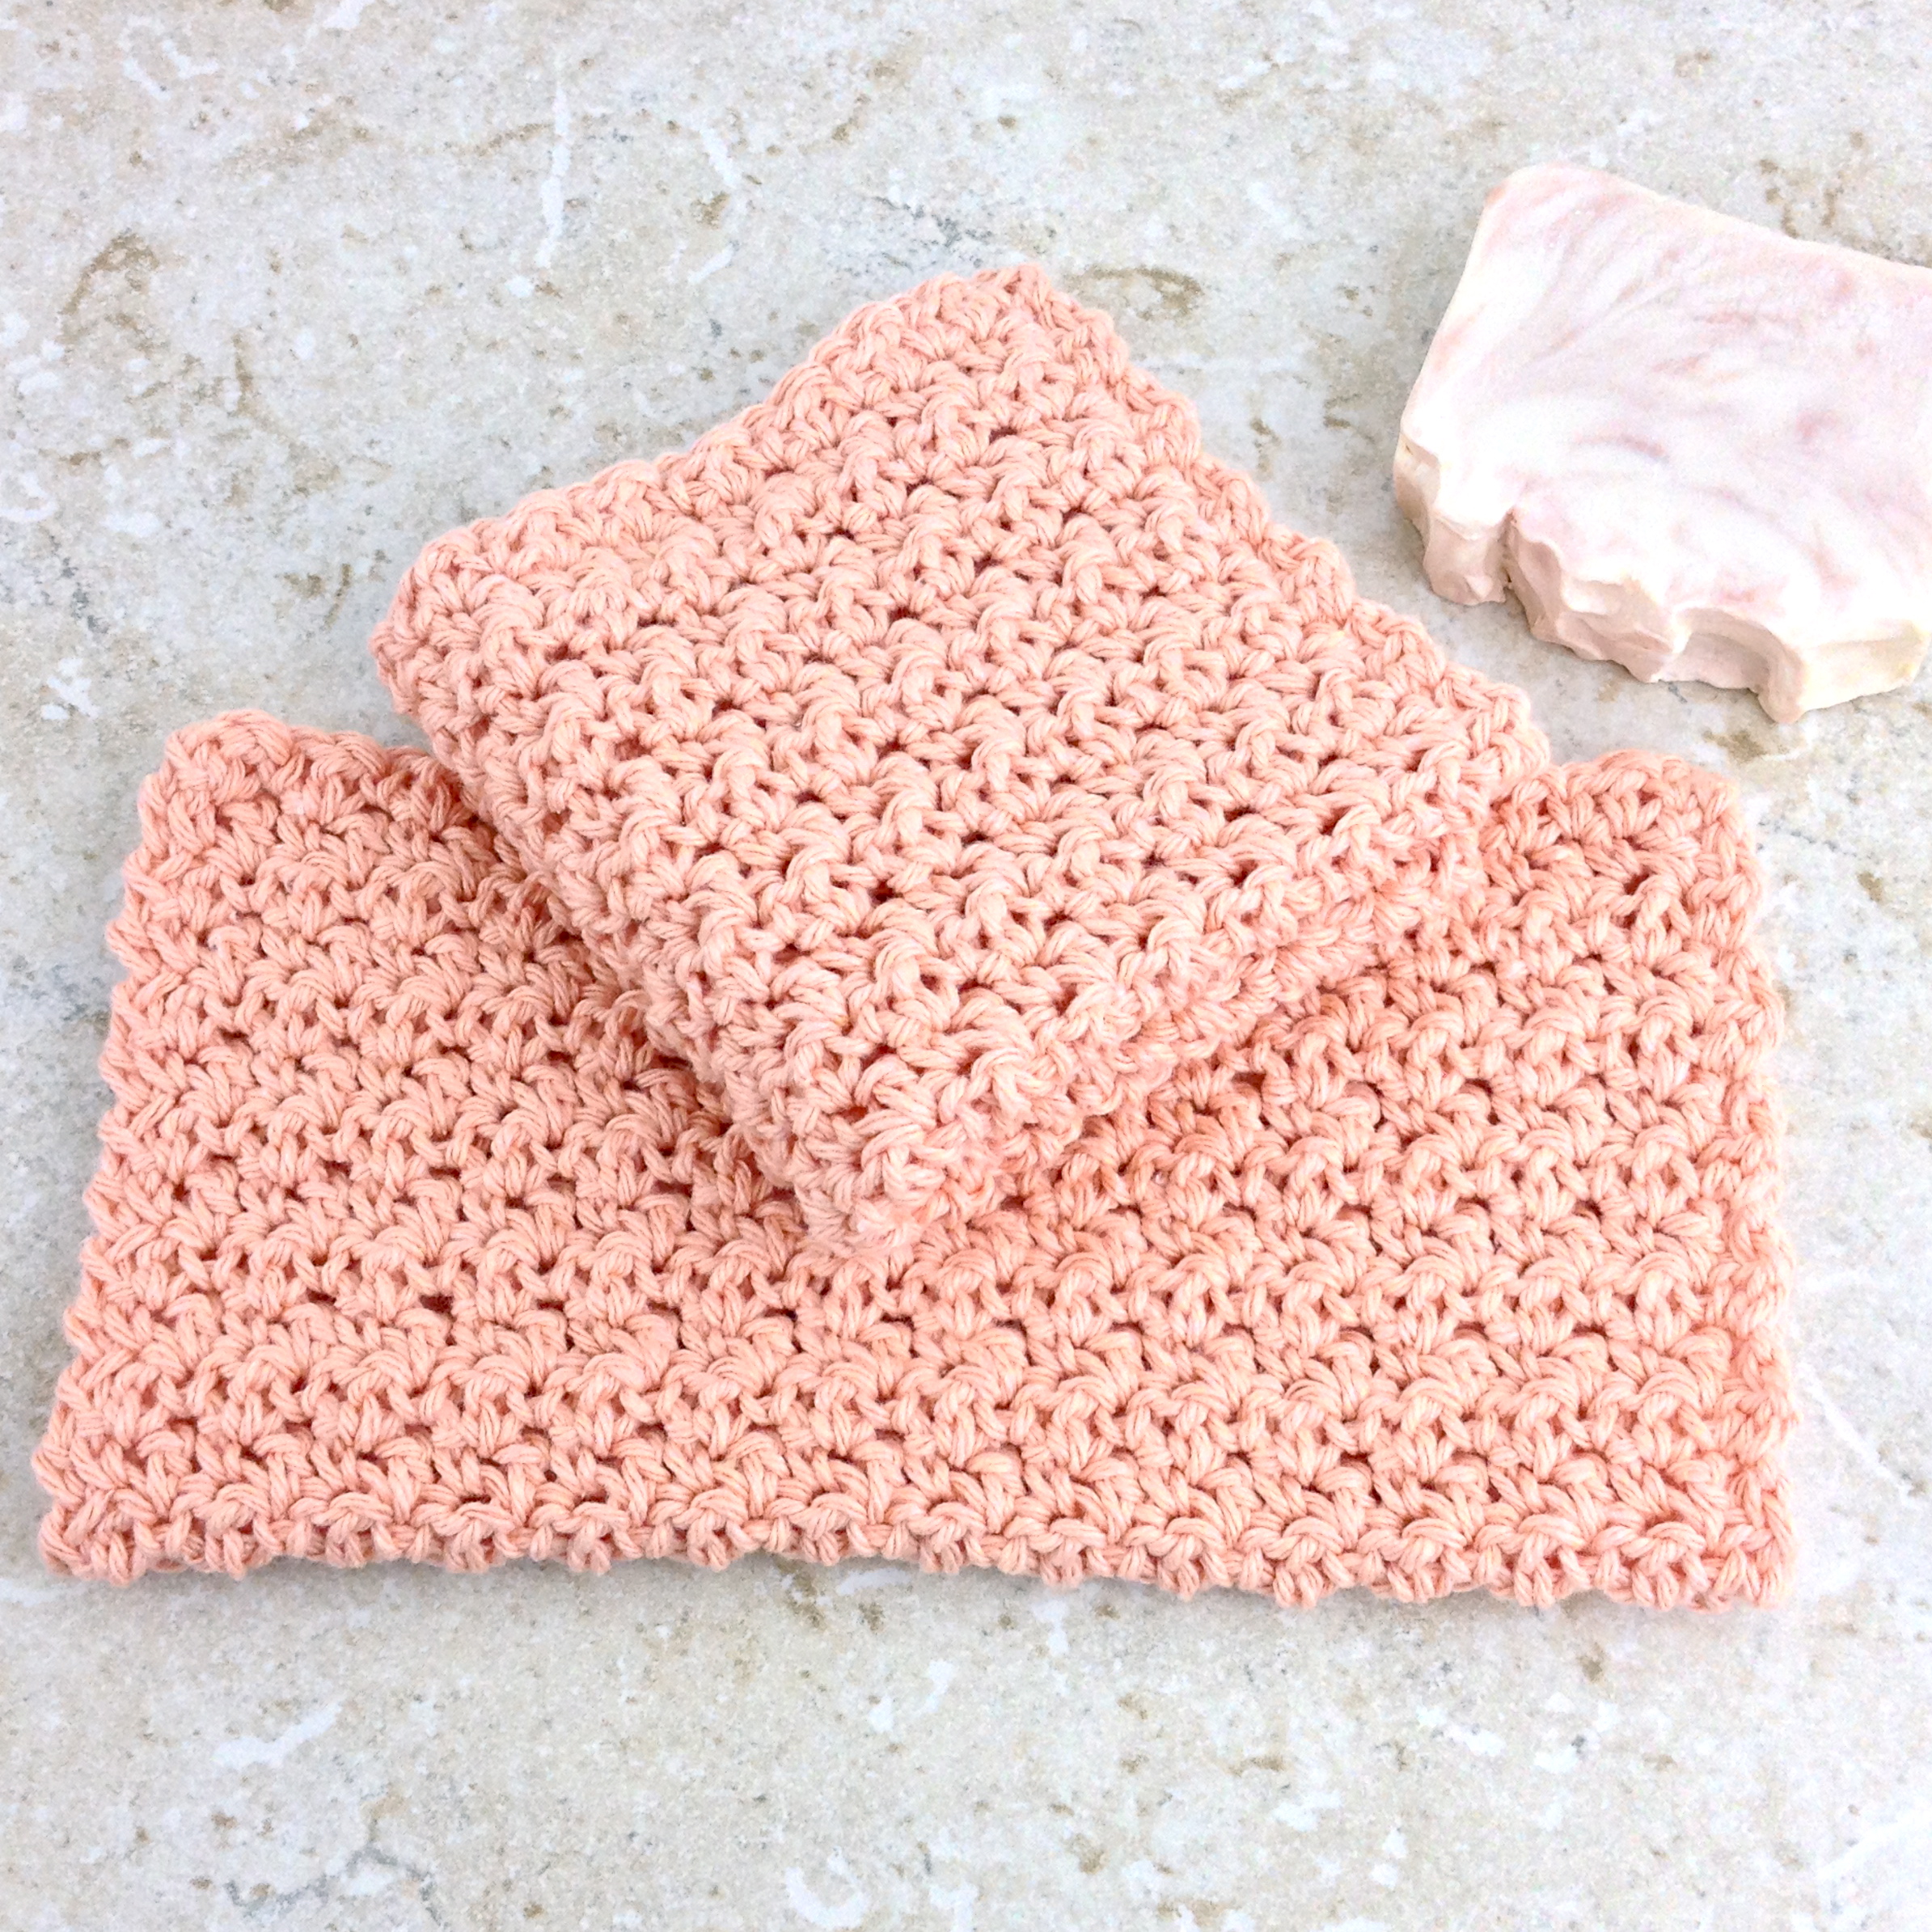
Posting My First Crochet Pattern – Easy Cotton Washcloth Pattern

Crochet washcloth pattern easyCrochet washcloth pattern easy free pattern beginner

As the weather turns warmer I don’t want to crochet heavy wool scarves and winter accessories.  Besides, spring and summer mean traveling for me, and a quick project that can be easily transported (pulled out of a purse, for example) is exactly what I want.  Besides, cotton washcloths are wonderful to crochet.  I love the feel of cotton between my fingers.  They make such lovely gifts — housewarming, birthdays, hostess, wedding and baby showers.

Crochet washcloth pattern easy free discloth

There are so many washcloths patterns out there.  Mine is really just a modification of all those that have come before.  I really like my pattern because I only have to count the first row (foundation chain), and then it is pure “meditation crochet.”

This is my first pattern I’ve gone public with, so there may be bits of confusion — something I’ve left out/not explained well (just let me know).  But it is such an easy pattern.

easy crochet beginner pattern dishcloth

Materials:

  • Worsted Weight Cotton  — 50 to 100 yards (depending on size of the washcloth you want)
    • Cloths pictured use Bernats Handcrafter Cotton
    • Lily Sugar & Cream – you can get two washcloths from one 2.5oz (120 yard) ball
    • and Premier Home Cotton (Premier is a cotton blend – 85% cotton, 15% acrylic and I find it is better for larger cloths because it holds its shape better when wet, but is slightly thinner than the other two brands).
  • Hook Size — I use 5mm  for Premier Home Cotton;  A 5.5mm for the thicker Bernats and Sugar & Cream
  • Scissors and Yarn Needle to weave in ends

Gauge is not important for this project.

Stitches

  • CH – Chain
  • ST – Stitch
  • SC – Single Crochet
  • DC – Double Crochet

Pattern for approximately 8×8 inch washcloth (mine measure 7.75 inches square)

  • Foundation – CH 25 loosely
    • To increase the size of your cloth, increase in multiples of 2 and then add 1 (e.g., 25, 27, 29, etc.). Each pair of stitches increases the row size by approximately 1/3 inch.
    • I find adding one CH to the foundation gives me a sharper/matching corner on my cloths.
  • Row 1: Work through the back “bump” loop, you will get a nice edge on your cloth (for a tutorial on how to do this, see HERE.DC in third back loop, *SC in next back loop ST, DC next back loop ST,* repeat  * until end of row ending with a DC
    • At the end of row one, I pull up the tail from the start of foundation chain and pull it through the last DC of row 1.  I then crochet over it in row 2 & 3.  This saves time weaving in ends 🙂
  • Row 2: CH 1, Turn; DC in next ST (both loops now, regular crochet),
    • *SC in next ST, DC in next ST* repeat * until end of row ending with a DC
  • Row 3+: Repeat Row 2 until you’ve reached the desired size of your cloth.
    • Fasten off leaving 6 inch (or more) tail.  Weave in tail across two rows in two directions.

You always end the row with a double crochet, CH 1 & turn. No counting (yay!) — which makes this the easiest pattern to follow while traveling or watching hockey/football  🙂  SC are always on top of DC and vice-versa. The result is a nice “fluff” stitch that gives a lovely soft texture and pattern.  I do not edge the washcloths as I like them just as they are.

Crocheting in the first tail and not edging saves time per each cloth.  Each 8×8″ washcloth takes me about 40 minutes (from start of first stitch to last tail woven).  Time is important, especially if you want to sell your product (which I do).  The more time I put into an item, the more expensive it is. Many people love the luxurious feel of a cotton cloth, but don’t want to necessarily pay a lot for one.

Wash your cotton washcloths in icy cold water to set the color and block the edges & corners if necessary.  Tie a pretty ribbon around them and they are ready for gifting.

Crochet washcloth pattern easycrochet washcloth free pattern

So that is my first public pattern.  There are many similar (such as this one) and much more fancier patterns out there, find one that works for you and crochet away.  Remember, you can always purchase them from me if you run out of time–Curious Purple Pig on Etsy.

Happy Crocheting 🙂

easy dishcloth patter crochetFree pattern crochet dishclothcotton washcloth free pattern crochet

Just Add Paper

After working on hundreds (maybe 1000s) wedding invitations, programs, door cards, escort cards….you name it.  I have found some tools I really love.


This handy little envelope jig ROCKS!

custom made envelopes


Made by We R Memory Keepers, under $20 (at this posting, less if on sale).

It makes just about any size envelope you desire and works on paper, vellum and card stock.  I have now made 100s of envelopes without issue.  It takes some time, some elbow grease, but you get custom envelopes in the end, so I like it.


Curious Purple Pig rating is a wowzy 9 oinks.

 It would be 10 if the scorer was not plastic and instead bone.  But otherwise a good tool and investment if you have lots and lots of envelopes to make.


How it works:

Cut your paper to size.  the chart on the jig tells you exactly what size you’ll need.  I love my guillotine cutter for cutting…

diy envelopes

Line up your paper to the corresponding score line.

custom envelopes diyenvelope making

Punch and score (use the tool along the indented line on the jig), rotate counter clockwise -and keep punching a scoring (all 4 sides).  After the first punch you line up the previous score line with the arrow on the punch instead of the ruler.

2014-10-09 14.17.03 diy envelopes 2


Optional step is to round the corners–

2014-10-09 14.17.52 diy envelopes 3

Then just fold and glue 🙂

2014-10-09 14.18.52 2014-10-09 14.19.58 custom made envelopes


You can seal the envelopes with stickers, glue, or use a “lick and stick” adhesive so you can seal them when you are ready.

I’ve been busy preparing for the holidays.  Combined with my Cuttlebug Embosser, there is no stopping me 🙂

blue snowflake holiday cards custom Custom Christmas Cards and tags retro Christmas Cards and Envelopes custom Christmas Envelopes and cards custom christmas Cards Envelopes Tags


I actually use the custom envelopes to send out all my jewelry purchases from my Etsy shop.  I love the personal, custom touch:

custom packaging envelopes


Back to Painting Flowers

I love to paint.  My grandmother taught me: if you can’t move it, paint it, and if you can’t paint it, put a flower in it.

I wonder if that was my inspiration for painted paper flowers?

ivory painted paper flowers large

large ivory paper flower

ivory wedding flowers diydiy painted paper flowers

I started making these a few years ago for weddings (including my own).  And yes they are a bit labor intensive, but I can’t help myself.

So here is a re-run of the step to create these lovely large flowers (the tutorial uses a mix of green paint, but the process is the same).

large paper flowers ivory

Supplies

20130121-124913.jpg

*Regular copy paper (or drawing paper)
*Hot glue gun
*Stick or Floral Stem Wire
*2 colors (or more) craft acrylic paint (the cheaper the paint the better, I’ve found)
*Water
*Paint brush (for painting and rolling)
*Tape

CuriousPurplePig Rating: 8.5 oinks, could be messier. I do manage to get paint in my hair though.   Takes about 30 minutes per flower to cut/paint the petal (not counting paint drying time), another 30 minutes or so to assemble.

Steps

Each petal is cut from regular 8×11 paper, free form “teardrop” shape. The outside petals take 1/4 of the sheet, the inside ones, 1/6th. I advise at least 8 petals of each size (24 total). I stack the paper and do them all at once. I cut waves into the edges too.

Lightly fold the paper in 4ths for the larger petals:

20130121-125046.jpg

20130121-125055.jpg20130121-125120.jpg

And into 6ths for the smaller, inside petals (fold in half, then into thirds):

20130121-125128.jpg

20130121-125137.jpg20130121-125147.jpg

Using two colors of watered down craft acrylic paint, I quickly paint each side of the petals. The water helps to blend the colors. Just follow the form of the petal with your strokes. Only use one brush for all colors.

After making hundreds of these flowers, I’ve found that the cheaper the craft acrylic paint the better.  The “good stuff” is too thick and has to be watered down to much.  I don’t want to offend Craft Smart brand, but it works really well for watered down/blended effects like these flowers.

20130121-125200.jpg

20130121-125219.jpg20130121-125227.jpg20130121-125235.jpg

I used more darker color on the smaller inside petals, and went lighter on the outside. More water mixed in lightens the paint too.

20130121-125208.jpg

20130121-125244.jpg

{{{{{paint drying}}}}}

20130121-125252.jpg

Find a center stick. I have a bunch of old dried stems lying around that I use. But a skewer stick will work too (or a stick from your yard–even better). The larger the flower, the larger the diameter the stick.

UPDATE: I switched from using sticks to florist wire stems like these:

I then glue a piece of styrofoam or rolled paper on the end to give it a larger diameter base to glue the petals. With the wire, I can bend and shape the flowers as needed in the centerpiece, much better.18_gauge_green_stem_floral_wires_20pcs

I use a paint brush handle to roll the paper edges.

Low temp glue glue gun, my best friend. Attach the petals by gluing at the base.

If the paper tears a bit, just dab with glue to seal it. Keep working around until you like it.

20130121-125308.jpg

20130121-125316.jpg

20130121-125329.jpg

20130121-125336.jpg

20130121-125349.jpg

20130121-125357.jpg

20130121-125406.jpg

20130121-125417.jpg

20130121-125434.jpg

20130121-125443.jpg

20130121-125456.jpg

I used more glue and then florist tape to secure it more to the stick/floral stem.

20130121-125508.jpg

20130121-125516.jpg

Done!

painted paper flowers wedding

paper flowers centerpiece

unique large paper flowers

20130121-125529.jpg

Yarnoholic

Maybe I need help, but fall is coming and I can’t stop buying yarn.  My thoughts turn to watching football (Go Broncos!) while curled up on the couch crocheting.

The colors are amazing (too bad I’m not a better photographer) and I can’t stop.  The first step is admitting you are out of control.

Lately, I’ve been addicted to these layered loop scarfs using sashay/ruffle yarns.  I love the mix of colors and soft texture of these yarns.


Mixed blues chunky chain scarf

 You can’t get more autumn-y than this:

autumn colors chain scarf

 And Purples, of course:

violet purple chunky chain scarf


The “How To”

This is one long crochet chain.  And I mean loooonnggg.  300 inches (25 feet).  I used an extra large wood bead painted and sealed that keeps the layers in place.  I used a Q hook to make these, but use the size necessary for your yarn.

These scarves are adjustable- just pull at the individual chains to extend or shorten.  Or remove the bead altogether, or….

layered infinity scarf orange redeggplant infinity scarf loopaqua blue infinity scarf orange scarf necklace

extra long blue infinity scarfpurple long loop scarf

deep blue loop scarfdeep purple chain scarf necklace

amethyst infinity scarforange reds chunky chain scarves


So now I have a huge boxful of different colors, including blue and orange (again, Go Broncos!).

 multi strand layered loop scarf

Curious Purple Pig Rating:

There is a messy part–I get to sand and paint the wood clasp bead on the scarf.  So I manage to get paint all over my hands which is 8 oinks.  I’m only happy when I have paint on my skin.

A high Oink factor for color.

Overall: A respectable 8 Oink ratings for these layered loop scarves. 


But…

The classic gray scarf remains one of my favorites:

gray infinity scarf

Back from Wedding Crafting…

Curious Purple Pig is back.  I’ve been off working on weddings for the past year and had a blast.  But during the past year I have also been collecting.  Collecting for jewelry making mostly, but ideas for other items as well.  The messier, usually the better.  But this week’s craft is not messy at at all (minus a few bits of dried catnip). Crafting for pets can be fun, because they don’t judge you (and are usually wowed by the process just as much as the finished product).  So here is my latest…

christmas toy for naughty cat

Naughty Cat Christmas Coal

Who doesn’t know a bad cat who  deserves lumps of “coal” for Christmas?  Don’t have time to make it?  It’s for sale in my Etsy shop: CuriousPurplePig (again, shameless self promotion).bad cat christmas present

Curious Purple Pig Rating:

  • High oink factor because cats love it (see the video below 🙂 )
  • High oink points for easy (as long as you can grow catnip–which is really a type of weed)
  • Low oinks for not being messy at all (don’t even need glue 😦 )

Overall 7 Oinks

Product testing with a focus group of one cat (raw & unedited coverage of test results).     Two Paws Up!  It’s a hit 🙂

Supplies:

  • Black yarn
  • Catnip (you can buy it, but I used my own from plants we have at home–best to have some nice potent organic nip for the felines)
  • Tulle (fine mesh)
  • Crochet hook to fit your yarn & yarn needle
  • Container, Tag and rest of packaging is optional.

Steps

1) Crochet the coal lumps.  You could also use fabric or felt, but crochet (or knitting) gives it a nice texture that cats love.  There is no pattern here.  I start out with a magic circle, do one round of 4-6 single crochet stitches, and then go nuts.  I added some bobble stitches for bumpy texture.  Just work chaotically in rounds with mixed stitches until you have an odd shape.  Leave it open on top.  You can then use a yarn needle to close the lump after you have stuffed it.

bad cat pet toy

2) Wrap some dried catnip in fine mesh/tulle.  I like to double wrap it to make sure it doesn’t get out.  Use organic catnip if you can. Stuff the balled up catnip-in-tulle into the lump of coal.

3) Optional–Cats love the crunchy sound of cellophane, so add in a few 1×1 inch squares.

4) Use a yarn needle and close up the lump.

christmas coal gift

Done!

If giving as a gift, wrap it up by decorating a box or bag.  The cats won’t care, but the human will appreciate it. I hope your cats enjoy! 

christmas pet toy