


 Our beautiful kitchen suffered from a boring tile backsplash. Actually, the tile backsplash had already received a “fix” from the previous owner. It was painted ivory (grout & all) to cover what I can only assume is hideous 70’s style tile underneath. Painting ugly tile is a definite improve, but it left our white kitchen rather boring. Also, since the backsplash was painted ivory next to a white countertop & cabinets, it always looked dirty and grungy.

Inspired by the numerous decoupage coaster crafts from simple ceramic tiles, I thought why not decoupage the tile up on the backsplash? The color and design options are endless. And if covering non-painted ugly tile, it would save a lot of prep work (e.g., sanding, primer coat). Besides with decoupage textures are possible that are difficult at best for the average DIYer with paint alone.
And, it is cheap. The title is not a typo. A whole backsplash redo, even for large kitchens, is only a few dollars. I spent less than $2 to do my average size kitchen.
UPDATE: Well it has been exactly a year since I did this and it looks as good as the day I finished. Absolutely nothing sticks to that gloss sealer I painted over it. The easiest backsplash to clean–easier that tile, because the painted grout is sealed too. I still love it!
What you’ll need (supplies):

You must have–A paint brush, scissors, white school glue mixed with water, cocktail napkins (or paper of your choice), sealer. Optional is paint for the grout (if you want to change the color from what you have), paper cutter (to make a lot of quick, precise cuts).
Time Commitment:
Cutting –about 15 minutes; decoupaging –1-3 hours depending on size of your backsplash; painting/sealing–an hour or so depending on the number of coats you do & if you paint your grout lines.
Skill:
Easy. this is my first decoupage project (other than when I was a kid). But I am handy with a paint brush!
Purple Pig Rating:
9 oinks out of 10–It has all the elements I love: slightly messy, easy, very cheap, and transformative (the wow factor).
DETAILED STEP BY STEP:
1. Clean your backsplash. It seems like cleaning is always the first step to doing anything fun (and messy). this is a step you can’t skip though. Scrub it down. Get rid of all the grease, grime, and un-indentifiables. Clear your countertop while you are at it so it will be easier to work.
2. Pick your paper, color, and design. This is a fun step. Cut a few colors out & tape them up to get a feel for how it will look. I used inexpensive solid color napkins (black & blue-grey). They work great and only cost about $.50 a package. One regular napkin makes four 4×4 tiles (what a bargain!) When picking out the paper, remember you’ll be doing a lot of cutting, so pick something you can trim with ease and cut in mass.
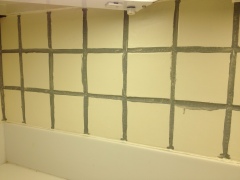
2.a. (Optional Step) Paint to change the color of or refreshen the grout. I suggest doing this before you start decoupage tiling so you won’t have to worry about staying in the lines while painting. The grout (& tile) in my kitchen were all painted ivory. I wanted a grey-blue grout color to match my new “tile.” As you can see in the picture, you really don’t have to be a great painter for this step. Keep some extra paint for touch ups and corrections after the decoupaging. Let the paint dry thoroughly before decoupage tiling.

3. Measure your existing tiles ( tile only, not the grout) and cut your paper to match. I had 4×4 tiles throughout. Using a paper cutter (or scissors), cut napkins to match. Quick tip: make a slim cut along both edges where the napkin is folded, and then cut to size. This will save you from unfolding lots of napkins. A standard cocktail napkin makes four 4×4 tiles. I left them as 2-ply, but you separate the plies to get eight tiles –the paper would be thinner of course (which may be the look you want–experiment!). I cut about three to four napkins at a time. All in all, it took about 10 minutes to cut all my napkin tiles.


Cut a sliver along each folded edge to save lots of time unfolding the napkins while cutting.

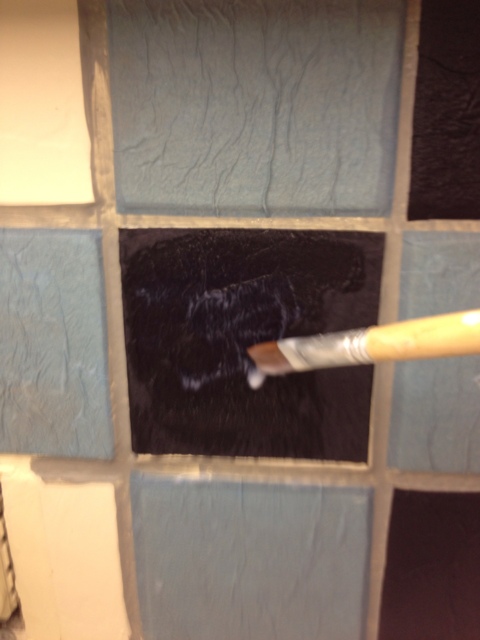
4. Apply the napkin tiles –the fun & messy part! Mix one part of white school glue with two parts water & mix well. You can also use premixed, store bought decoupage medium, like Mod-podge, if you prefer. Brush it onto a tile, place cut napkin over the wet tile and smooth out lightly with you fingers. I wanted texture in my tiles, so I immediately went over the top of the napkin with the glue mix. To get a smoother surface, you should let it dry first, and then decoupage over the paper. There are lots of sites with decoupage instructions–all of which have more expertise than me. Try some different methods of application and go with the look you like. I wanted texture (AKA: wrinkles), so my method worked great and was really fast. This was basically my first decoupage project, so that gives insight to the ease of the project.
Cut napkin tiles as you go to accommodate half tiles, switches, etc. Be very careful around electric switches–it is a glue & WATER mix that drips. The key words there were water and electricity. Enough said?
The medium will drip so wipe up as you go. Stand back and look at your work every once in a while too. No use continuing if you don’t like how it is turning out. you can still take them down easily when wet (so no fear).


5. Let it dry over night (12 hours) or a day. Brush on another coat of glue water medium. You can repeat this step as many times as you like . Each layer of decoupage deepens the over all look.
5a. (Optional) Go over your grout lines with matching paint to camouflage any mistakes (e.g., crooked/uneven tiles). You can also use matching paint to the tiles to cover small rips.
6. Seal the entire backsplash with craft varnish, or your favorite sealer. Water based sealers will keep the original colors while oil based sealers will yellow over time giving your work an aged appearance. This will protect your new backsplash from, well, splashes. Again, you can coat it several times with your favorite sealer/varnish. Also, remember using a matte, semi-gloss, or gloss sealer will give you different looks. I like shiny things, so gloss it is!
Near final product -before gloss top coat sealer.
So let me know what you think. I love the look. I’ll post more close up pics once I have it sealed (the above pictures are before sealing). We’ll be replacing our countertop and few appliances within the next few years, but in the meantime the kitchen doesn’t have to be boring (or ugly). And yes, that is a built in can opener in the backsplash (now you know why I think it is 70’s style tile under that paint).
Here are some more photos–I love touching it. The texture is awesome.

Related articles
- A One Dollar 3D Tile Backsplash Makeover A Nest For All Seasons (apartmenttherapy.com)
- How a Custom Designed Backsplash Can Add to your Kitchen (mosaictilestone.com)
- DIY Kitchen Tile Backsplash (answers.com)


Comments on: "$2 Backsplash" (6)
amazing! That’s such a neat idea. Definitely make the kitchen looks a lot lot brighter!
I’ve been looking at all sorts of DIY projects im getting confused in deciding which I’d like to use 😀
Our floor is slate (bluish) and all the appliances are black, so now the whole kitchen looks more cohesive. The plain ivory backsplash had to go. Thanks for your feedback! Congratulations on your engagement too 🙂
thank you!
Great job! It looks wonderful!
Great tutorial! I like all the pictures of the steps. I’m considering doing this with my backsplash and I think this post clinched it for me. Thanks!
You’re welcome! It has held up wonderfully. It still looks new after 6 years.